Downloading Data
Share
Data can be downloaded in Data Center. You can access it just after starting the simulator using Download Historic Data button.

Choosing Data Folder
We refer to Data Folder as a folder where Forex Simulator stores all downloaded data. By default, it is your Documents folder, but you can easily change it to any other using Change Folder button in Data Center. Selected folder will be displayed in the top part of the window in green.
Downloaded data may take quite a lot space. One instrument usually has 1 – 2 GB. Make sure that your Data Folder has enough free space.

Downloading Data
Step 1
Choose data provider (data source) from the drop down menu. The list of instruments will update accordingly.
If you are not sure which one to choose, we recommend to start with Dukascopy.

Step 2
Choose the instrument you want to download and click Download next to it.

Step 3
A small window will appear. Here you can choose how much data you would like to download, for example, last 1 year, last 2 years, last 5 years or everything. Whole range of data usually has 10 – 20 years depending on selected instrument. Click Download to start.

Step 4
When you click Download, the simulator will show the progress of download. You can wait until it is finished or stop it at any time with Stop button.

Step 5
When download is finished, the simulator will show the downloaded range of dates. You are now ready to use this data in your simulations.

If you now click Download again, it will delete all existing data for this instrument and download a new range of dates. The simulator will warn you and ask for confirmation before doing that.
Updating Data
As time goes on, more and more new data will become available. You can update any instrument with recent data quickly, without having to re-download everything.
You can update data using Update button next to selected instrument. The simulator will start downloading new data and show you the progress. You can wait until it is finished or stop it at any time with Stop button.

Sometimes you may see this message: There is no new available data. It means that your data is already up-to-date and there is no newer data available on the server.
If you want download data from different date of range.
Unfortunately, the only way to do it is to delete existing data and then download it again selecting a wider range of dates. It is not possible to download only a few years before 2015 and add them to existing data.
Deleting Data
At some point you may want to delete data to free up disk space. You can do it using Clear button next to selected instrument.

Of course, you can also delete data by deleting files manually from your Data Folder.
Bulk Operations
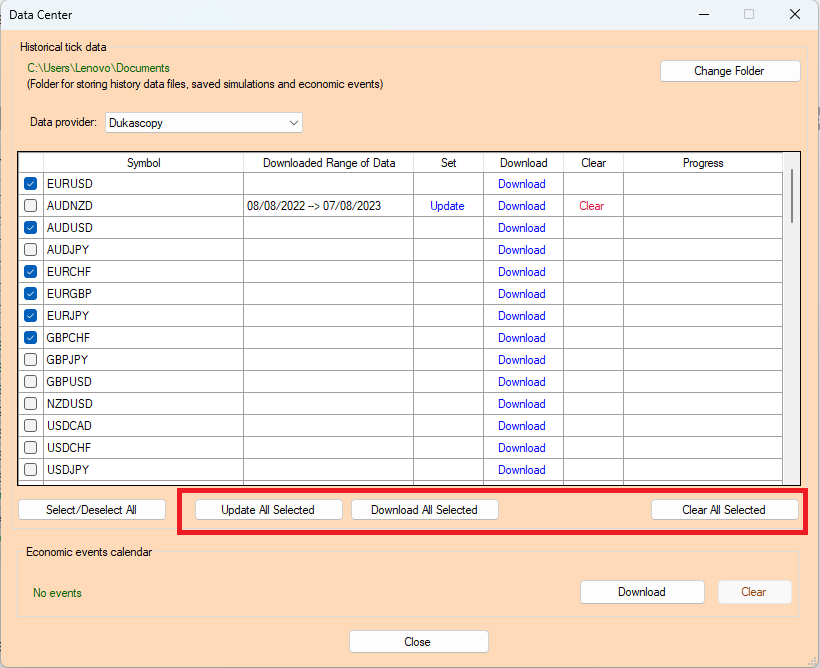
It is possible to download, update or delete data for several instruments at once.
Step 1
Select instruments which you would like to download, update or delete. You can also use Select/Deselect All button if needed.

Step 2
Choose the action you would like to take: Download All Selected, Update All Selected or Clear All Selected.

Step 3 (Only in case of Bulk Download)
A small window will appear, where you can choose how much data you would like to download, for example, last 1 year, last 2 years, last 5 years or everything. Click Download to start.

Step 4
A new window will appear showing you the progress of bulk operation. You can wait until it is finished or stop it at any time with Stop button.

1 comment
https://youtu.be/9dheOPj8ck4?si=9mcJC7oIeQ1wTlkc
I managed to install it and it works perfectly, just follow the steps as described in the video. Good luck!!